This comes back with an error sudo: invalid option – “y”
I ran without the -y and it again gave the warning but finished with no errors. I ran it again and no warning this time. Strange thing is, I ran the “umount” command first and it came back as already unmounted. And AFTER that got the "volume was not unmounted cleanly.
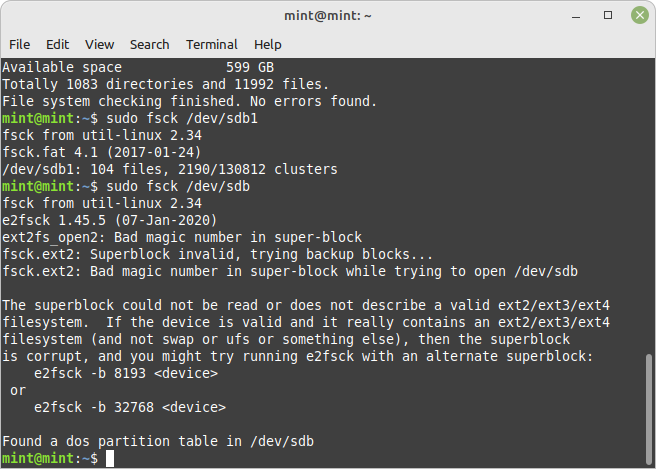
I also ran this on my boot disk /dev/sdb1 and on the entire drive. On sdb1 it just read out the file count but did not say whether it was good or bad. On the entire sdb disk there seems to be some "Bad magic numbers. Bad Magic?!! Linux?!! LOL
I managed to fubar my persistent Mint live usb where it wouldn’t even show up as an option in BIOS. A little fsck from the laptop fixed that and I’m back on the Dell on the USB. I can access all the drives from the file manager on that usb stick and the Home folder did get removed from the boot drive as per command. The Home 1T drive is available and has all my data. If I select it from the left side of the window, only my “michael” folder is there. When I open that, all the rest of the folders are there as well. I’m playing music and videos form there right now. I am still in the login loop though.
Hey @GrillerMiller,
I’d recommend booting from the LiveUSB and then looking for Gparted on the menu. If it doesn’t exist, install it. Then select your sdb device and run its filesystem check. That app is a bit more “aggressive” with its repairs than Gnome Disks, so run it to see if that will help.
The -y flag was basically to auto-accept any repairs, instead of asking you at every step of the way. This is also the reason it’s always good to have two backups.
Oh, and the sda1 needs to be mounted at home with small H - as Linux is case sensitive and it will consider the “Home” as an entirely different folder.
I’m not sure, but I believe his last lsblk was while he was running from the LiveUSB.
And he also gave the partition for his new /home the Label “Home” at the time of creation. It looks to me like the way it is mounted under ‘/media/mint/Home’ that it is picking up the label of the partition while being mounted by the LiveUSB OS.
If the fsck comes out clean again then I think he may be ready to go back to post 9 (in this thread) and continue with your instructions starting at:
Thank you both @vasileios and @dennis for your replies. This computer is my primary desktop but I have several others and my daily driver is the HP laptop so I’m not pressured into getting it going in a hurry. And if I need anything I boot from the live USB, am able to access my data and all my music and videos are there and functional.
So if I do what you are suggesting it will also fix the login loop?
One quick question, just before the power flickered and your computer rebooted, had you run the following command yet? rm -R /home/$(ls /home)
if you did run that command then you will probably not be able to log in as your regular user but should be able to log in as root and entering roots password. You do have a root password don’t you?
I did run the command and my original home folder is gone. All the contents are safe in the 4T which is disconnected as well as the 1T Home drive. I cannot login from the GUI. However I can login as myself in level 3 and sudo su into root.
Then it looks like you are ready to complete the rest of the instructions in post 9.
Boot into runlevel 3 then switch to root with sudo su -
If you have already installed the arch-install-scripts then you should be able to skip that step, skip the echo step and skip removing the old home because it is gone.
Then complete the instructions starting with the mount
(double check which drive the new ssd is from the lsblk and change the mount command accordingly if needed)
mount /dev/sdb1 /home
After following the rest of the instructions you should be able to reboot and log in as normal.
After the mount command I went to the next command ls -l /home. The results were
drwxr-xr-x 5 root root 4096 Jul 20 11:23 EFI With the EFI in blue.
So I went to the next command since it didn’t have my name on the directory and ran chown -R $(ls /home):$(ls /home) /home/$(ls /home)
That returned…invalid user: “EFI:EFI”
As root@Dell:/#
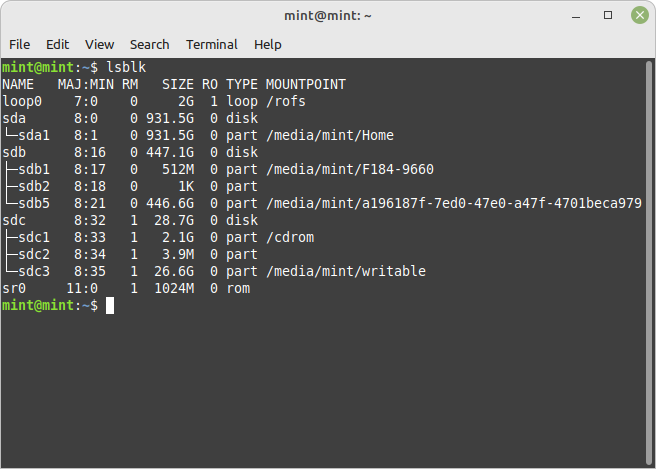
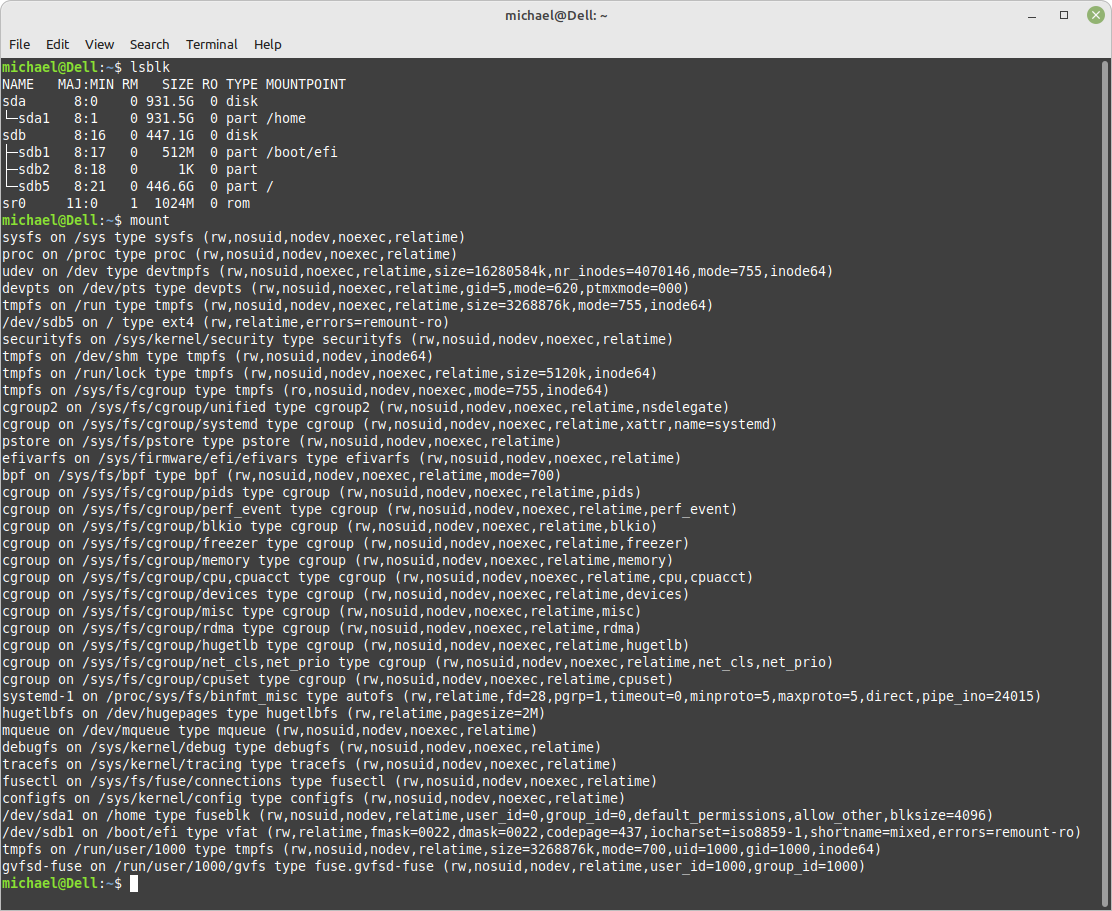
sda1 932.5G with no mount point.
sdb1 512M /home
sdb2 1K
sdb5 446.6G /
As michael@Dell:/$
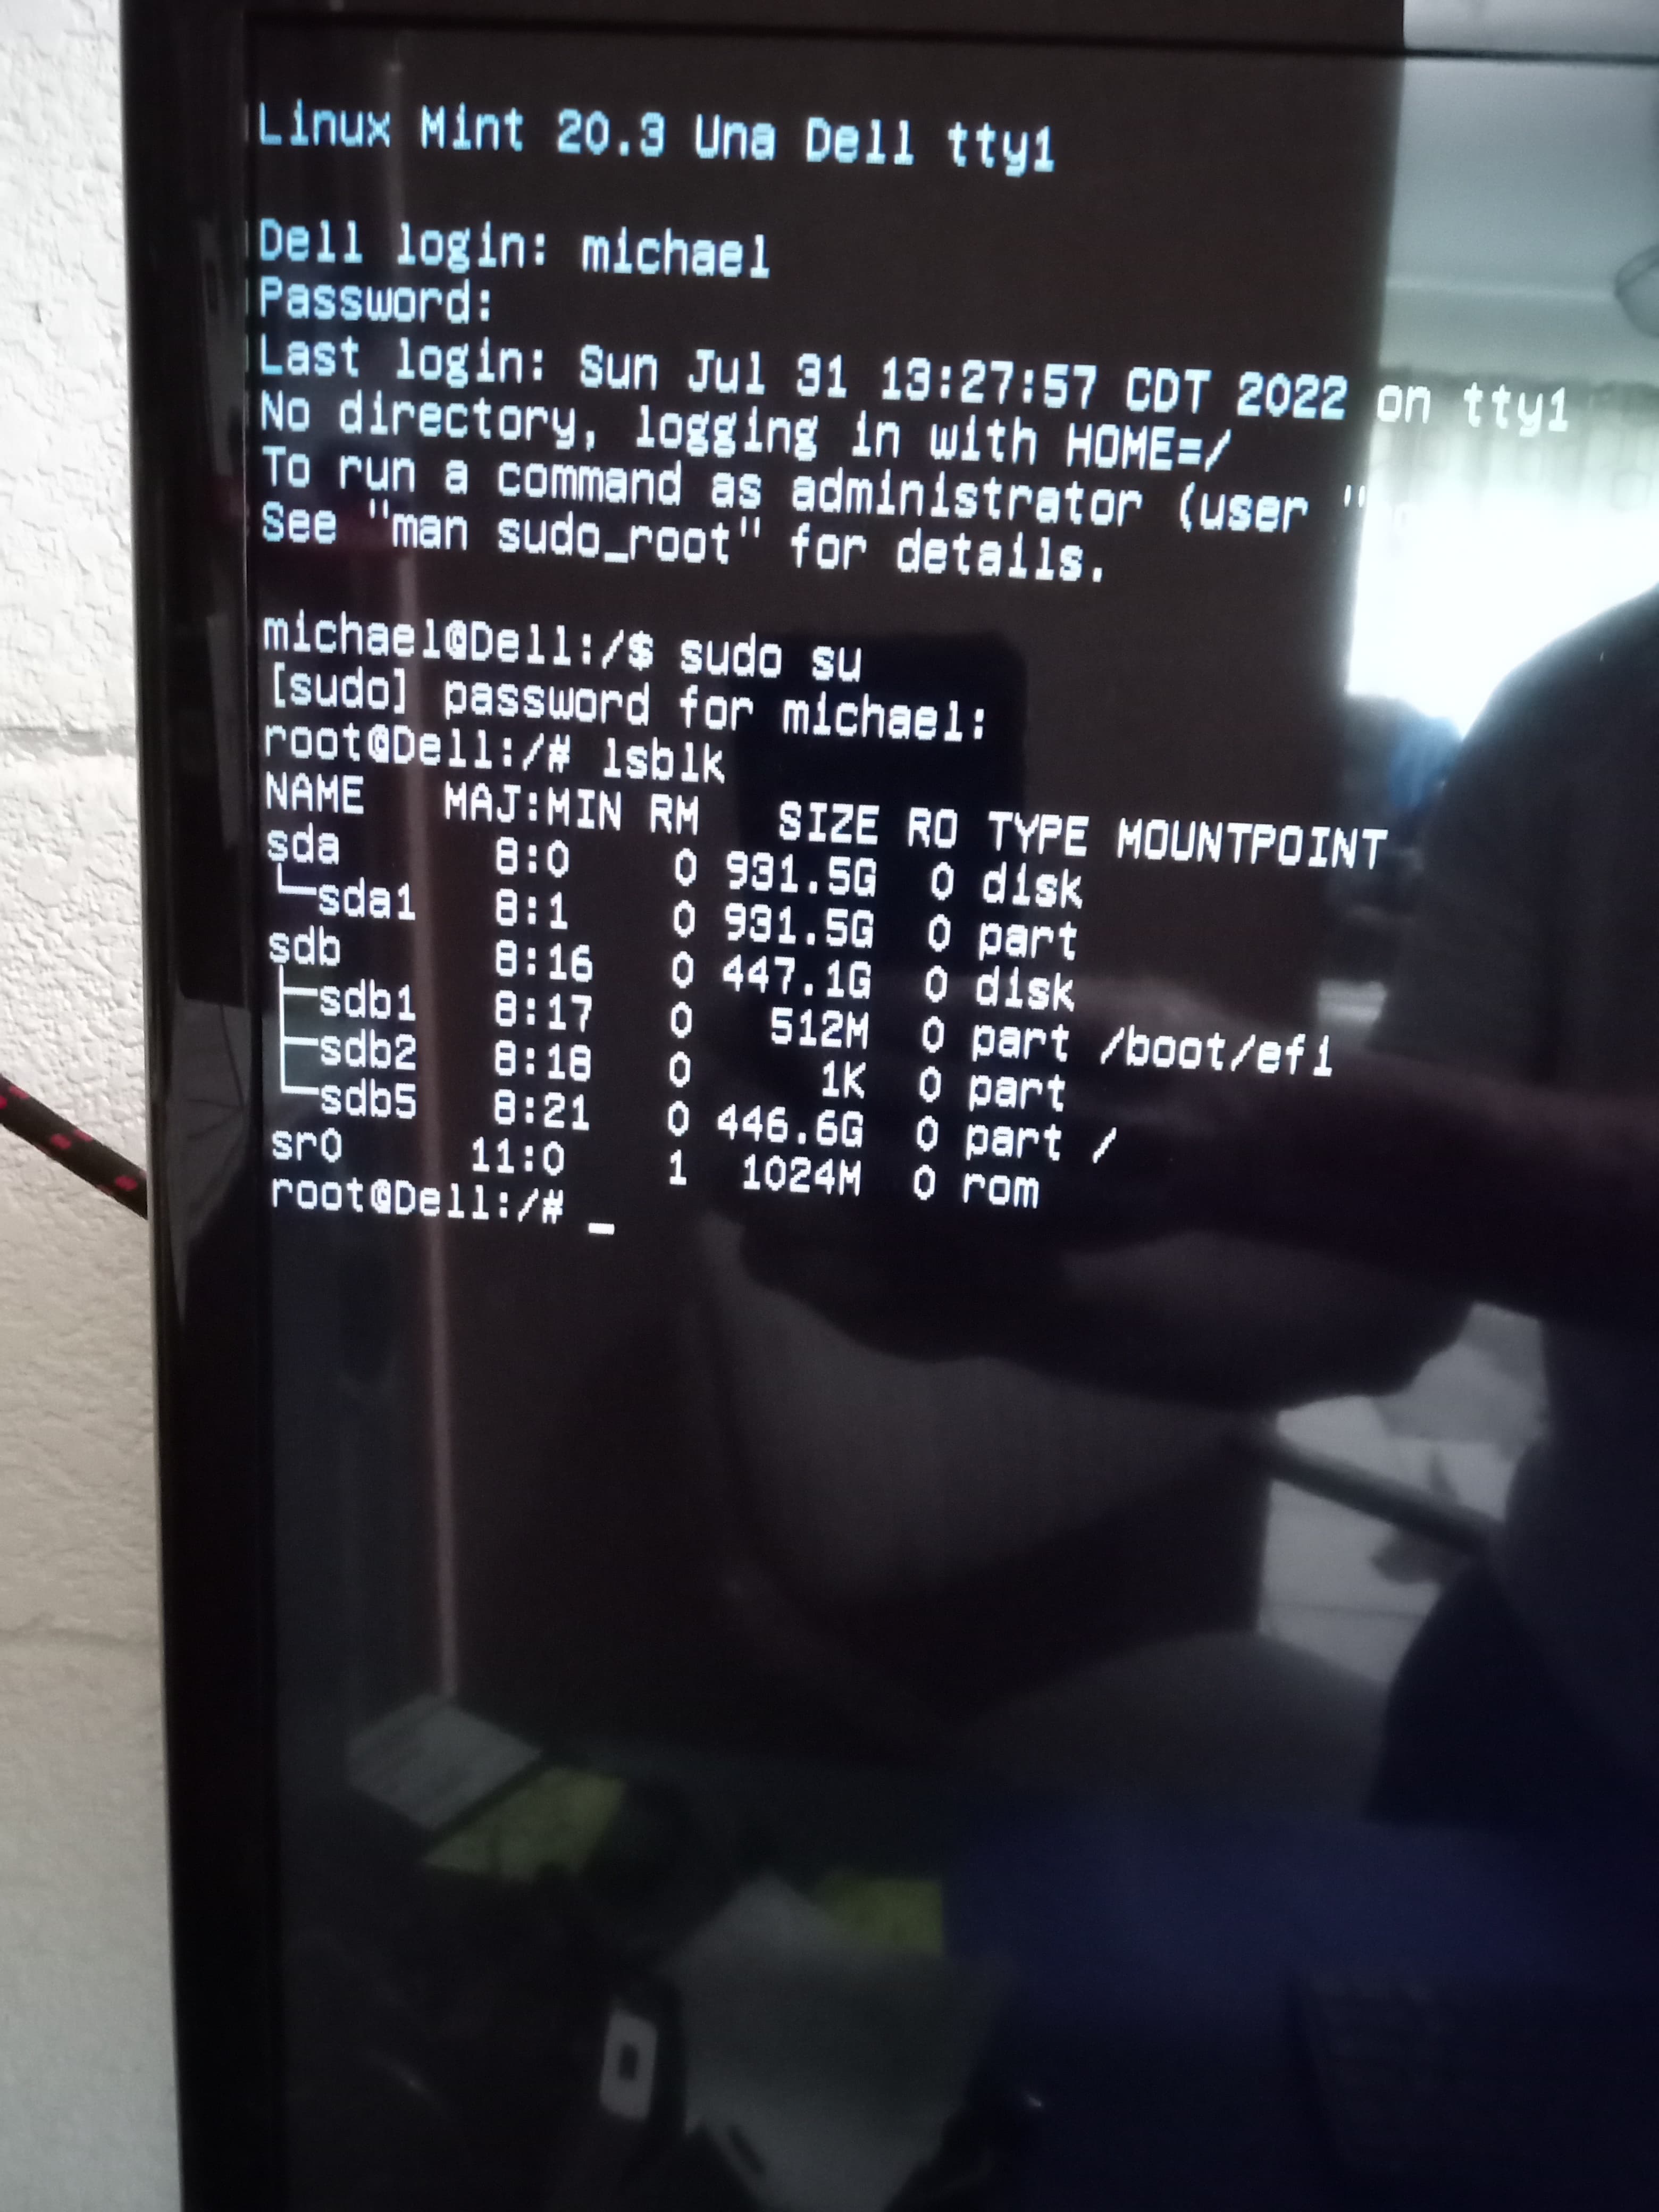
sda1 932.5G
sdb1 512M /boot/efi
sdb2 1K
sdb5 446.6G /
sr0 1024M rom
When I do ls -l /home as michael@Dell:/$ it returns “total 0”
ls -l returns 28 lines showing ownership. The home dir shows like this…
drwxr-xr-x 2 root root 4096 Jul 27 11:02 home
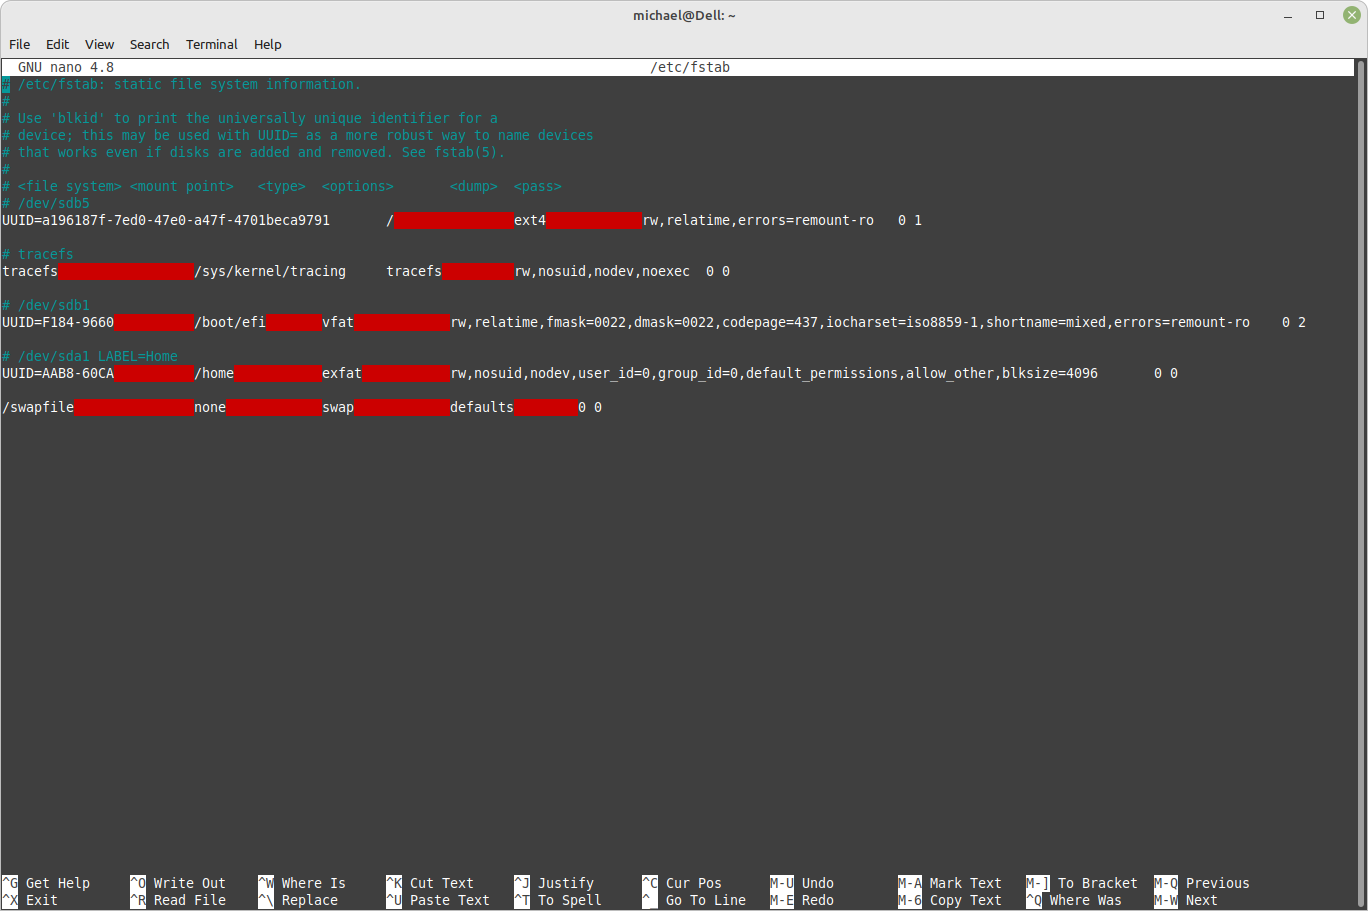
There is a swapfile.
When logging in, after I enter my password it displays the last login then the next line is "No directory, logging in with HOME=/
For now, use just the root terminal.
Your EFI partition inadvertently is mounted as /home. We don’t want that. (It gets confusing when switching back and forth from a USB stick to the installed OS. lsblk will display the same partition as a different drive when doing that.) We are going to need the EFI partition mounted correctly for the rest of the commands will probably not function correctly.
Also, keep in mind that a swap file is different from a swap partition. Your swap file will be picked up and mounted correctly in the remaining commands when we get to them. Only if you have a swap “partition” do you need to enable it with swapon.
The simplest way to get back to where we need to be is to reboot into runlevel 3, sudo to root and then take a picture of the lsblk command and post the pic.
So in the root terminal: shutdown -r now
will reboot then be ready to add the 3 to the kernel command line
use the command mount /dev/sda1 /home
to mount your home direcotry.
Everything else looks ok.
There is no swap “partition” so no need for the swapon command.
After running mount /dev/sda1 /home
then continue with the rest of the instructions. Being very careful to read and type correctly. Double check everything. I’m being overly cautious because there a couple of ‘finicky’ commands coming up.
I can’t thank you enough @dennis for taking your time on a Sunday to help. That did it! I’m back on the desktop. I haven’t had time yet to check everything but home opens and everything seems in place. There was a note about a thumbnail cache being bad or something but there was a “fix” button. I’ll have a closer look this morning. Thank you again to @dennis and @vasileios !!
You are welcome. Vasileios’ detailed list of instructions were exactly what you needed to get the job done. You could think of me as the gutter bumpers at the bowling lanes. I just nudged a couple times to help keep from falling off. I am happy you got it done.
Your perseverance is what pulled it out. Good job!
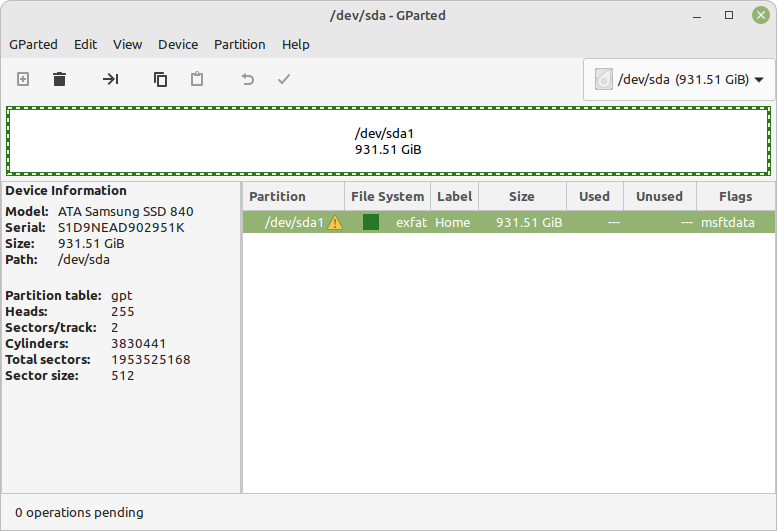
I’ve had a lil minute to check it out this morning and everything seems to be intact except for Pictures, which I can copy from my 4T backup and sound doesn’t work. Display is a bit off as well. I tried booting to the live usb to see if I could run a file system check but get these errors in GParted.
I’m wondering at this point, do I try to fix it after all the time we spent on recovering the system, or do I disconnect my 1T, do a fresh install and run this procedure again only see if I can do it right this time?
The “Fix Now” button didn’t do anything. For the "A problem has been detected with your thumbnail cache. Fixing it will require administrative privileges. Buttons are FIX NOW and DISMISS.