What To Do with Dual Hard Drives on Desktop?

I installed Linux Mint last week on my desktop and wiped Windows off the system. I just realized LM is on my 125gb SSD and I still have a 1tb hard drive available that I partitioned and split 3 ways today but haven’t mounted yet.

Is there any way to combine 2 hard drives so I can bump up my meager 125gb root storage?

Any help would be great. Thanks :slight_smile:

Hello @jmwidmer, and welcome to the forums!

Yes, there are a few ways of doing so: the easy way and the intermediate way.

The easy way will basically be to make your drive available as a folder in your system, and you can store all your files there.

The intermediate way is to use your second hard drive as your home folder. This offers the advantage that everything you download, store, and use (including all the app preferences) will be stored on the 2nd drive. Then, the 125GB will be only for your system. However, this will need a process that has to be done with great precision (or your system will not log you in).

Please let me know which method you’d like to proceed with.

1 Like

Hi Vasileios, thanks for responding! I think I’d like to go the intermediate way as I’d like to be able to utilize the largest storage possible for my home files. Any chance you could shoot a video on how to do this? If not, I understand as I know you’re super busy :slight_smile: thank you for your time and all your hard work!

Hey @jmwidmer!
No worries & it’s my pleasure to help. I was just outside grabbing a few much-needed cables (basically, converters). To go via the intermediate route, first, I’ll need to know if you have backed up all the files on the second drive. Please make sure that you have, as we’re going to take a bit of a dive.

Also, please keep your phone camera ready so that we are 100% certain we are on the right path. :blush:

Sorry for the late response. Had family duties haha. 2nd drive has been backed up onto an external ssd and has been wiped. I’ll have to jump on this tomorrow now but let me know how you want to go about it👍

Will do! I’m glad you enjoyed some family time. It always comes first!
We can continue on this tomorrow. :blush:

Thanks a ton Vasileios, I work from home so I’ll chime in when I’ve hot some time😊

1 Like

Wondering what happened here? I’m searching the forums for exactly this. Looks like this thread ended Oct.21,2021. Wanting to move my Home folder from the 500Gb SSD which now has less than 100Gb free, to a 1Tb SSD. I also have a 4Tb HD in this Dell. The plan is to use the 1Tb strictly as Home but suggestions are very welcome. The 1T is fresh, nothing on it. The 4Tb only has 1.5Tb free. It’s got disk images, backups, etc.

Hey @GrillerMiller!
Are you looking to turn the entire drive into your home folder? If so, there is good way for doing it.
First, copy your user’s folder (from the home directory) into your 1TB SSD.
Second, create a backup of that same folder to your 4TB drive for safety reasons.

Note
If you want, you can use a backup/sync utility called FreeFileSync and select your entire home folder (your username, like /home/user). You can install it as a flatpak via the following command:

flatpak install org.freefilesync.FreeFileSync

If you go that way, make sure that you tell it to copy hidden files. If you can’t find that option, when the copy is complete, simply open up your 1TB drive with your file manager and hit CTRL+H to make sure that the hidden files were copied. If they were not, then the settings will not transfer and you’ll end up in a login loop.

No matter the path you choose for the copy, make sure that your copied home folder has the hidden files.

Once done, your 1TB drive should only have the folder with your username in it. This is extremely important!

End Note

PROCESS

Now starts the sensitive work, so make sure you double-check every step of the way.

Disconnect the 4TB drive from your system and keep your main SSD and the 1TB one.

Reboot your system and enter the GRUB menu.

Highlight the first load option and press the E key.

Go to the end of the linux line, where you can see the quiet splash options and add the number 3.

Press F10 to boot with this temporary change.

It will drop you to terminal only. Login normally and then execute:

sudo su -

Keep the hyphen in, so that it automatically pulls you out of your home folder.

The next step is to check your drives’ structure and naming by executing:

lsblk

This will display the hardware level naming of all your physical drives and their partitions.

For the sake of demonstration, I shall assume your 500GB drive is the sda (with sda1, sda2, etc.) and your 1TB drive is the sdb (if it’s single partition, it will have the sdb1).

Keep in mind that if - for example - your main drive is an NVMe, it will appear as nvme0n1p1, nvme0n1p2, etc.

To know exactly which is which - in terms of capacity, you can execute:

fdisk -l

This will tell you which drive/partition has what capacity. Jot the names of the devices down.

Now, install the script utilities that will secure the auto-mount of your 1TB drive:

apt install arch-install-scripts

Now, you will need to free the space on your 500GB drive by deleting the home folder.
First, make sure that the command will give you the correct location of your user’s home directory:

echo /home/$(ls /home)

If the path looks correct, then execute:

rm -R /home/$(ls /home)

Next step is to mount your 1TB drive where the old home folder was supposed to be.
Remember the naming convention we used above (i.e. your 1TB is the sdb1 or the name that is given to you via the lsblk and the fdisk -l).

mount /dev/sdb1 /home

Now check that the mount was correct, by executing:

ls -l /home

It should have a folder with your username in it.

The reason I placed the -l flag on it is to check that your user is the owner of the folder. If it’s not, execute:

chown -R $(ls /home):$(ls /home) /home/$(ls /home)

What the above command does is pull the folder name from the /home directory (which is your username) and apply it automatically, without you having to type it.

If inside the /home folder is just another folder with your username and it has the correct ownership permissions, then we are on a good path.

Now, to make it permanent:

Next, we’ll need to backup the current fstab file, that secures the system mounts.

cp /etc/fstab /etc/fstab.backup

If you have a SWAP partition, i.e. in sda2, now it’s the time to activate it, so that it registers in the auto-mount

swapon /dev/sda2

Now, we’ll use a utility from the Arch scripts we installed earlier:

genfstab -U / > /etc/fstab

This will generate a new mapping for the auto-mounts, which will include the SWAP.

Now you can safely reboot your system and enjoy your expanded space - plus the extra space on your 500GB drive. :smiley:

2 Likes

Thank you so much for this! I had to run boot-repair after removing the Manjaro ssd. I used one of your guides here in the forum for that thank you again! Apparently grub lived there. I am currently running FreeFileSync from a Mint persistent live USB. There were errors enough for everyone from the beginning but just ignored and pushed on. I’m copying 342Gb at a very quick rate. When done I’m going to open the home folder, display the hidden files then drag and drop to the 4Tb drive. Then start the procedure you provided. I’ll check back in once finished.
Someone may need to post something to keep it going. I found out yesterday I can’t post more than 3 replies without someone else posting.

1 Like

So the FreeFileSync didn’t seem to get everything. The original folder is 6988 items at 341.5GB and the sync is 6162 items at 110.5GB. Not entirely sure how to proceed. For now, going to try drag n drop. I expect errors there as well. Edited update…that didn’t work either. Going to swap the live usb on 2.0 to another live usb 3.0. Then try again. The problem with both types of copy is permissions. Going to have to learn how to manage that first I think. Edited…The Windows version has a “Run as Admin” option that I have not found on the Linux version. That would do it. Searching how to do that I come to How can I run FreeFileSync as root - FreeFileSync Forum where it says “Just like any other program, via command line it’s:
sudo ./FreeFileSync”. This is from the site admin.

This is what my terminal said…“michael@Dell:~$ sudo ./FreeFileSync
sudo: ./FreeFileSync: command not found”.

So, still trying to figure this out.

1 Like

The ./ means “the executable file is located in this directory”.
How did you run it as a regular user?

2 Likes

After the installation it puts an icon in the applications from the start button. You can right click the app icon but run as Admin is not an option. It will only run if I click the icon.
So, if I can find that directory I should be able to right click inside the folder and select open terminal here or open terminal as Admin or something like that, yes? Then run the command again?
Oh, and Dennis, thanks again. I had saved your reply from last year in my Saved folder in Telegram. Then copied to a doc and saved that today. There’s gold in them there words.
One more little thing…I found in the Software manager that there is a problem with the flatpack version not being able to deal with flatpack files. :crazy_face::crazy_face:

1 Like

What operating system/version of linux are you running (for further reference if needed). I know you are using Linux Mint from a live USB, but what is installed on your hard drive?

But this should work from the live USB of Mint.
run the ‘FreeFileSync’ from the menu button. Then open a terminal and widen it out to pretty much full screen width. Then type
ps aux
That will fill up the terminal with a bunch of stuff you might not want to see, but in one of the last lines near the bottom of the terminal window you should be able to find the “path” to the FreeFileSync that is running. It will probably be something like
/usr/bin/freefilesync or something similar. After you have the path then you can close down the running FreeFileSync window.
Then, simplest for me is, type (in the terminal)
sudo /path/to/filename
something like
sudo /usr/bin/freefilesync/filesync

I do not know the name of the executable file but it should have shown up after your ps aux command above. That is the path and the file name you want to type after the sudo.

2 Likes

I’m running the latest version of Mint on the Dell. Ubuntu, not Debian. I keep it up to date. As soon as I can get back on it I’ll try this. Thanks again!

1 Like

Hey @GrillerMiller!
Also, thank you @dennis for pitching in!

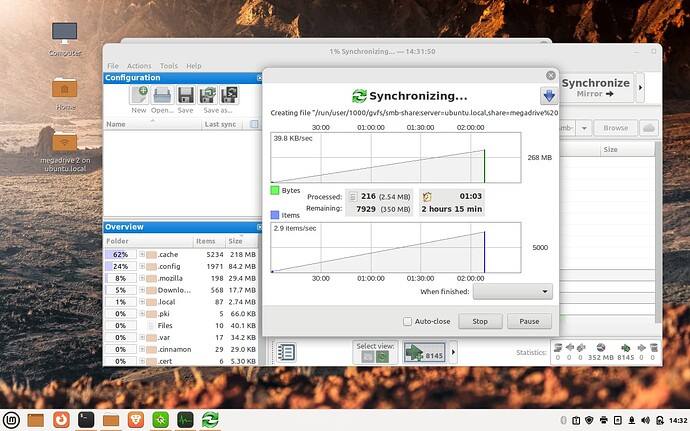
I was just testing FreeFileSync, the Flatpak edition and it appears to synchronize (with the Mirror option) all the files, including the hidden ones. I am running LMDE 5 on an old 2008 laptop, so if it works for this old guy, it should be all right for anything newer.

On the left side of the screen-captured below, you can see the dot files/folders get copied as well.

1 Like

Did you run it from a menu or from a terminal? If from terminal what command did you use? Griller may need that info.
Since I don’t have his distro or the FreeFileSync program, I was just trying to help him find the path to the executable.
I’m happy you were able to get back to him.

2 Likes

I ran it normally from the menu and it worked like a charm.
In all honesty, the distro doesn’t matter, as flatpaks are universal in that manner. The only thing one may need is to grant them extra permissions when accessing system space, but in the user space area, you don’t need much - if anything.

1 Like

So possibly Griller may just need to make sure he uses the mirror option?

2 Likes

That would be my guess. I checked the final copy and all .dot (hidden) files were transferred as well.

2 Likes