So my next question. Since the Mac was basically wiped, do I still need to select Etcher for Mac OS?
Not if you’re using the Mint system to create the bootable USB.
Personally I only use dd from terminal. With care it is a no fail way to do it.
On Mint, download your desired distro image and save to lets say “Downloads” which in terminal will refer to /home/yourusername/Downloads/distro.iso where yourusername is your logged in user and distro.iso is the selected distro.
Open a terminal:
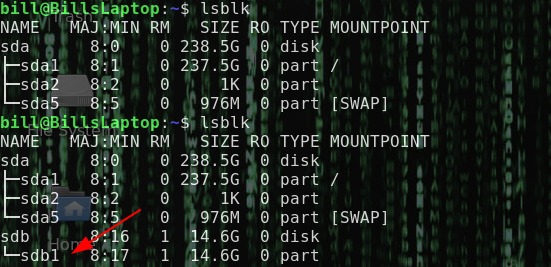
Run lsblk(those are lowercase “L”, insert thumb to write(at least 4GB for most distributions, full Debian ISO will need an 8GB).
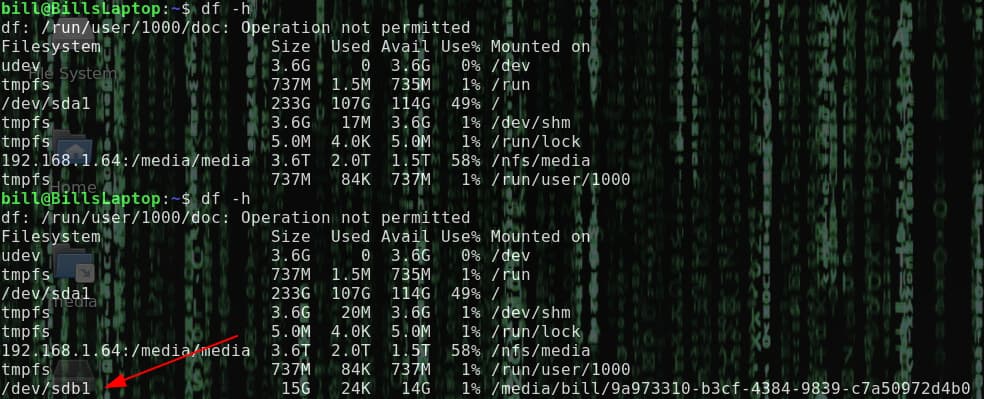
Run lsblk again. Note the /dev/sd* difference. NOTE: The inserted thumb has to be unmounted which you can check with df -h as you can see in the image that I am mounted. To unmount it
Run sudo umount /path/to/mount (listed on df -h ouput)
or
Run sudo umount /dev/sd** (replace **with your listed dev)
Run cd Downloads/ to switch to the Downloads folder.
Run
sudo dd if=distro.iso of=/dev/sd* bs=1M status=progress
You can use “ls” prior to see filename of the ISO then while entering the command use the “TAB” key after starting typing the file name to autocomplete the filename. Be absolutely certain of the /dev/sd* (replace * with the actual reported device without a number. In my case the USB was /dev/sdb
See the attached images.

Let me know if anything is unclear before you proceed.
First, I’ll check in terminal to see if the USB is unmounted by checking with df - h, correct? If not mounted, I run sudo umount /path/to/mount in the terminal, still on the Mint system.
Once certain it’s unmounted, I can download Etcher for Linux x64 (64-bit) (AppImage) from my Mint machine, and the distro (going with Mint from the Linux site). I’m also verifying by downloading sha256sum.txt and sha256sum.txt.gpg. Is this correct. I believe some of my issues are because the USB is still mounted? I hadn’t found anything on mounting/unmounting to this point.
I can do so much with a computer that’s running garbage, but I’m really new to Linux and feel very confused. I really want to learn this and greatly appreciate the help.
That is correct, if it’s already mounted it won’t work. “lsblk” before and after inserting USB will give the definite device name, “df -h” before and after inserting will let you know if it’s mounted, if it doesn’t mount when inserted it won’t tell you the device name in “df -h” output.
If df -h shows it is mounted you can use:
sudo umount /pathto/mount
or
sudo umount /dev/sdb1 (as was my case for my drive)
and then provide the sudo password.
Again, never used Etcher(used “Image Writer”) in like 2000 for Caldera Linux Netinstall CD.
I use “dd”, I do my bootable thumbs completely in the terminal and never had one fail.
Honestly, if you are getting the ISO directly from their site, not torrenting it or using a mirror you can bypass the verify, though the practice helps.
Thanks! I tried working with the USB last night, with no success. Back in November, I was working on installing Linux on the machine that has Mint now, back in November and had the USB set up correctly, but have no idea where it went. I’m babysitting my granddaughter today, so not working on this until she’s back home.
1 Like
@Tee, from your Mint machine, have you used “Image Writer” to make the USB? See the first part of this page for instruction (you don’t need other apps if you do this on a Linux machine): Create the bootable media — Linux Mint Installation Guide documentation
1 Like
My schedule went crazy again…I volunteer at a place where I’m basically on call.
I’m working on this tonight, so I’ll try it out.
When I use Image Writer, it is now listed as a CDROM and doesn’t allow me to download Etcher…
I’m back to making sure it isn’t mounted…and will move on from there.
This is a different USB than I’ve been trying to use. It’s a 4g, formatted to FAT32.
This tells me it’s mounted, but there’s a message, Operation not permitted. When I’ve moved on to unmount using /dev/sda1, I get the message, sudo: umount/dev/sda1: command not found
tee@tee-Latitude-E6420:~$ df -h
df: /run/user/1000/doc: Operation not permitted
Filesystem Size Used Avail Use% Mounted on
udev 3.8G 0 3.8G 0% /dev
tmpfs 784M 1.6M 783M 1% /run
/dev/sda5 234G 208G 14G 94% /
tmpfs 3.9G 0 3.9G 0% /dev/shm
tmpfs 5.0M 4.0K 5.0M 1% /run/lock
tmpfs 3.9G 0 3.9G 0% /sys/fs/cgroup
/dev/sda1 511M 4.0K 511M 1% /boot/efi
tmpfs 784M 22M 763M 3% /run/user/10000
What am I missing?
sda is the hard drive your running on.
Do not attempt to unmount it.
If the usb is plugged in already run this command one line and paste output:
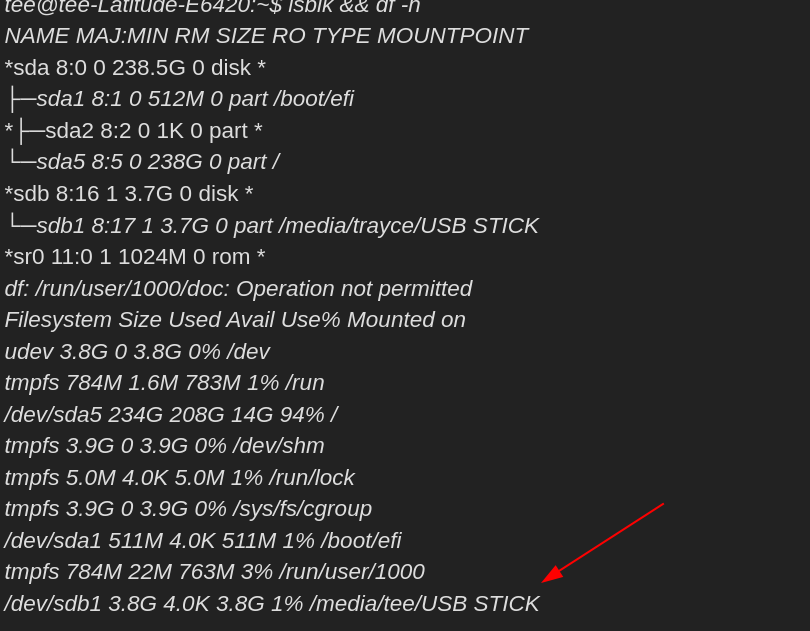
lsblk && df -h
fortunately you made a few mistakes in that command line.
As for Operation not permitted that is only because that df -h command was not ran with sudo which is not necessary for what your doing.
Ah, thanks. I know just enough to cause trouble for myself!! ![]()
Here’s what I have:
tee@tee-Latitude-E6420:~$ lsblk && df -h
NAME MAJ:MIN RM SIZE RO TYPE MOUNTPOINT
*sda 8:0 0 238.5G 0 disk *
├─sda1 8:1 0 512M 0 part /boot/efi
*├─sda2 8:2 0 1K 0 part *
└─sda5 8:5 0 238G 0 part /
*sdb 8:16 1 3.7G 0 disk *
└─sdb1 8:17 1 3.7G 0 part /media/trayce/USB STICK
*sr0 11:0 1 1024M 0 rom *
df: /run/user/1000/doc: Operation not permitted
Filesystem Size Used Avail Use% Mounted on
udev 3.8G 0 3.8G 0% /dev
tmpfs 784M 1.6M 783M 1% /run
/dev/sda5 234G 208G 14G 94% /
tmpfs 3.9G 0 3.9G 0% /dev/shm
tmpfs 5.0M 4.0K 5.0M 1% /run/lock
tmpfs 3.9G 0 3.9G 0% /sys/fs/cgroup
/dev/sda1 511M 4.0K 511M 1% /boot/efi
tmpfs 784M 22M 763M 3% /run/user/1000
/dev/sdb1 3.8G 4.0K 3.8G 1% /media/tee/USB STICK
so I’ll run sudo df -h /dev/sdb1
And I should make sure it’s unlocked before I move forward with anything? At least that’s what came to mind this morning, correct?
No need.
What needs ran is:
sudo umount /dev/sdb1
Leave the USB in the port, then switch to the directory where you downloaded the ISO, by browser, usually:
cd Downloads/
then on one line run:
sudo<SPACE>dd<SPACE>if=distro.iso<SPACE>of=/dev/sdb<SPACE>bs=1M<SPACE>status=progress
means there is a space there. Replace “distro.iso” with the filename of your ISO, if it is “linuxmint…”, directly after “if=” with no space start typing linuxmi and press the to auto complete the filename, hit ENTER.
Sit back and wait for prompt to return, 5 to 10 mins depending.
Another super long day…I’m beyond tired, but need to get this.
I have Linux Mint extracted and in downloads on the machine that has Mint on it. I have the USB still in. What am I missing?
I did the above and came up with:
tee@tee-Latitude-E6420:~$ sudo umount /dev/sdb1
*[sudo] password for tee: *
tee@tee-Latitude-E6420:~$ sudoddif=linuxmint-21-cinnamon-64bit.isoof=/dev/sdbbs=1Mstatus=progress
bash: SPACE:
I hit enter and got:
No such file or directory
when you see a surrounded by <> that means to literally use the key that would function i.e., , , ,
This may have been my fault for using the <>, as you can see this is what I typed above:
![]()
Typos matter, copy and paste this line as is no extra:
sudo dd if=linuxmint-21-cinnamon-64bit.iso of=/dev/sdb bs=1M status=progress
Duh, I see…my brain was done last night when I tried this.
No go…I’m sure I’m missing a step.
This is what I got:
dd: failed to open ‘linuxmint-21-cinnamon-64bit.iso’: No such file or directory
I have the extracted Linux file in downloads on the Mint machine. Is there something that I should be doing with that other than counting on terminal to know where to grab it?
What extraction? You should have gotten an *.iso file. Run a “ls -al” of the directory that you downloaded it to and paste the output please.
My apologies, I’m lost here…I’m not sure what you’re asking me to do.
‘linuxmint-21-cinnamon-64bit.iso is the name of the file in my downloads.