VM and Windows

Hey @PrettyGranny!
It seems your message slipped through the cracks of the forum notifications, thus I apologize for missing it. Remember, you can tag me with the @vasileios option, so that I can see it on time. :slight_smile:

By the way, since everything is currently working, I recommend you stay with it. It was probably a series of issues with updates, until things got stabilized.

However, if a problem does arise, then you can go to:

And download the latest production driver (which is for the long-term support) and save it to your Downloads folder. Then, open that folder and enter the terminal. Once there, execute:

sudo chmod +x ./NVIDIA-Linux-x86_64-510.54.run

The second step would be to uninstall the NVidia driver that runs on your system and return to the Nouveau. This will require a reboot. Once that is done, you’ll need to blacklist the Nouveau driver, so that it doesn’t interfere with the installation later on. To do that, open up a terminal and execute:

sudo bash -c "echo blacklist nouveau > /etc/modprobe.d/blacklist-nvidia-nouveau.conf"
sudo bash -c "echo options nouveau modeset=0 >> /etc/modprobe.d/blacklist-nvidia-nouveau.conf"

Then, make sure that the blacklist has been registered:

cat /etc/modprobe.d/blacklist-nvidia-nouveau.conf

It should produce the following result:

blacklist nouveau
options nouveau modeset=0

Then, you’ll need to update the kernel boot parameters via:

sudo update-initramfs -u

Once you reboot, hit the ESC or the Shift button to enter the GRUB boot menu.
If the boot menu is too stubborn to appear, you can implement a timer countdown so that it becomes visible. You can do so via terminal, by typing:

sudo nano /etc/default/grub

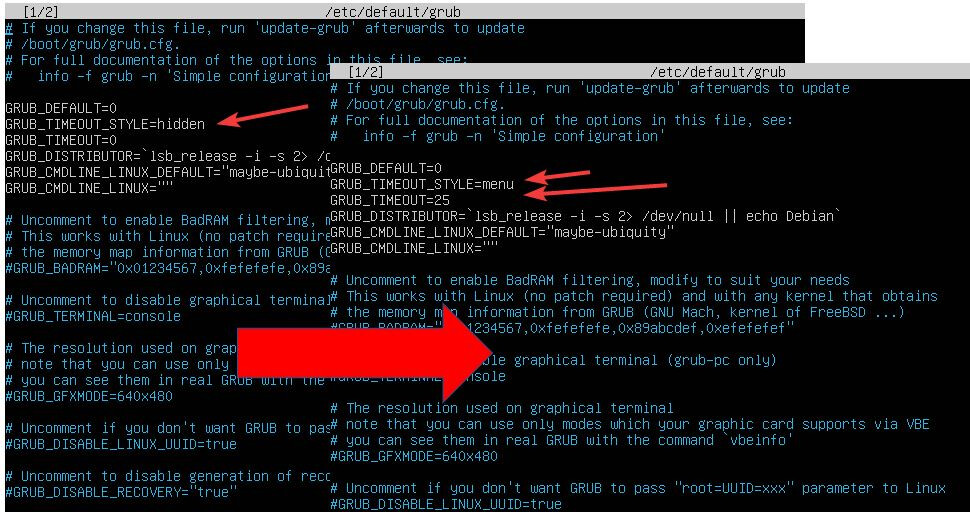
Change the GRUB_TIMEOUT_STYLE and GRUB_TIMEOUT as shown in the picture below:


Once you perform the changes, hit CTRL+O then Enter to save it. And CTRL+X to exit.
Note: You can set a different countdown timer, like 5 or 10 (it’s in seconds).

Then execute:

sudo update-grub

So that the new values are implemented.

Before you reboot, make sure you have the Dynamic Kernel Management System installed:

sudo apt install dkms

This will be crucial so that the NVidia driver has seamless transitions toward all new Kernel updates.

Two more crucial parts will be the installation of the Kernel’s source modules and development apps to allow your system to correctly build the driver:

sudo apt install linux-headers-$(uname -r)
sudo apt install build-essential

Once the installation of all the above finishes, reboot and when the GRUB menu appears, highlight the first option and press e.

You will see some… Chinese… when the editor appears. Navigate with the arrow keys to the command that starts with linux and includes the words quiet and splash. Or at least one of them. Go to the end of that line, press space and type in the number 3. Then hit the F10 so that your system boots.

It will bring you to a Level 3 TTY (terminal-only interface). Login with your normal credentials and go to your downloads folder:

cd ~/Downloads

Type in:

ls

And you should see the NVidia driver in there. At that point, execute:

sudo ./NVIDIA-Linux-x86_64-510.54.run

Follow the instructions and select Yes for the 32-bit libraries and the DKMS Kernel Modules that it will ask you that it needs to build.
Once the installation finishes, it will let you know. Then you can safely execute:

sudo shutdown -r now

And your new driver will be up and running. :slight_smile:

Okay @vasileios, here we go again! We lasted 8 days this time before my display went out. Using driver managers to switch back to the 510 version, same crummy result. I loaded nouvelle and then tried to use your most recent instructions, with … interesting … results.

The very first terminal command, sudo chmod +x ./NVIDIA-Linux-x86_64-510.54.run gave me an error. However, the instructions following it said return to Nouveau, which I had already done, so I continued through the blacklisting and editing the grub file, then installing dkms, linux-headers, and build-essential. These all seemed to execute as expected.

After a reboot, I was back to that awful display and prompt to run driver manager. I never saw a GRUB menu.

I have since used the Driver Manager to reload the 510 driver and appear to be back to a better display. I wonder how long it will last this time?

I’m about to ask my husband to give me an AMD graphics card for my birthday in July, if I can keep this darn NVidia card functioning that long!

What went wrong? Why didn’t I get a Grub menu? I mostly used copy and paste for the terminal commands to ensure I didn’t get typos.

I did use Ctrl-Alt-F3 to get to a Level 3 TTY, and followed your instructions there, but the sudo ./NVIDIA-Linux-86_64-510.54.run command gave me a ‘command not found’ error. The file is there in the Downloads folder, and I confirmed the filename was typed in correctly. Suggestions?

I run Windows on my MacBook Pro for VMWare Fusion. Nothing runs Windows better than a Mac (that really angers the MS fanboys - HA!) I only run windows because there are some things I need for work.

Hey @PrettyGranny!
It’s stubborn, I have to admit. Let’s take it a step further.
Can you copy and paste the contents of the following file?

/etc/default/grub

In worst-case scenario, we can instruct Grub to drop you directly to the TTY (abbreviation for TeleTYpewriter) upon boot. As for the chmod having issues, perhaps NVidia did an update patch on their driver and the file had a different file name? When you list the directory where your NVidia driver is downloaded, what’s the actual name of the file?

Once you send me the contents of the GRUB file, we can take it from there. :slight_smile:

The reason that you got the command not found is because the NVidia file was not executable. That’s what the ‘chmod +x’ command does. It turns it into an executable command.

You can still run Windows fully on VMware directly from inside Linux. :slight_smile:

If you change this file, run ‘update-grub’ afterwards to update

/boot/grub/grub.cfg.

For full documentation of the options in this file, see:

info -f grub -n ‘Simple configuration’

GRUB_DEFAULT=0
GRUB_TIMEOUT_STYLE=menu
GRUB_TIMEOUT=25
GRUB_DISTRIBUTOR=lsb_release -i -s 2> /dev/null || echo Debian
GRUB_CMDLINE_LINUX_DEFAULT=“quiet splash”
GRUB_CMDLINE_LINUX=""

Uncomment to enable BadRAM filtering, modify to suit your needs

This works with Linux (no patch required) and with any kernel that obtains

the memory map information from GRUB (GNU Mach, kernel of FreeBSD …)

#GRUB_BADRAM=“0x01234567,0xfefefefe,0x89abcdef,0xefefefef”

Uncomment to disable graphical terminal (grub-pc only)

#GRUB_TERMINAL=console

That is the end of the Grub file contents. I have looked at my NVidia file name, and it was correct, but you are right, it wasn’t “runnable”. That is easily fixed if I decide to do it. As a further report, since this last post on this forum, I have switched graphics drivers yet again and am using the 470 one at the moment. Interestingly, my Driver Manager now says it is the recommended one; which surprises me, since it isn’t the most recent one. I see a pattern here of NVidia drivers running, then not running, so I switch - until THAT driver quits working, so I switch back…over and over. I’m frustrated enough that I have suggested an AMD graphics card could be on my birthday list this coming July.

1 Like

I so hear you on that one, @PrettyGranny!
When I encounter these issues, I tend to do the manual install and then forget about the driver. Since it’s stable, this kind of manual installation remains unaffected by any updates from there on.

Now, if it stops working again, you can go to your /etc/default/grub and change the following line -
From:

GRUB_CMDLINE_LINUX_DEFAULT=“quiet splash”

To:

GRUB_CMDLINE_LINUX_DEFAULT=“quiet splash 3”

Then perform:

sudo update-grub

This will drop you automatically on terminal upon boot. Then, you can normally install the NVidia driver without issues. Once you do, remember to do a:

sudo nano /etc/default/grub

And change the:

GRUB_CMDLINE_LINUX_DEFAULT=“quiet splash 3”

Back to:

GRUB_CMDLINE_LINUX_DEFAULT=“quiet splash”

And then type in:

sudo update-grub
sudo shutdown -r now

And your graphics card should now be properly installed and you’ll return to your graphical environment on next boot. :slight_smile:

Remember: To save the file on the nano editor, you’ll need to hit CTRL+O and then Enter. To exit, you’ll need to hit CTRL+X.