This SSH Business

thanks to Jeff and team, i can now rapidly deploy a linux system. I am at my 4th episode. My challenge for which i have exhausted all the tricks in my book is using ssh to remotely. Have done it countless times but this last one is doing my head in…

Steps
Installed a new ubuntu. Updated wtih all the latest packages. Created keys with ssh-keygen.
used chmod to give 700 access to .ssh
used chmod to give 600 access to authorized_keys
copied content of public keys to authorized_keys
archived known_hosts to …old
removed existing known_hosts

tried ssh root@x…x.xx.x. didn’t work (previously using ssh)
tried ssh-copy-id root@x.x.x.x didn’t work

complains of permission

used ssh -v to debug…cannot figure out the issue

those with keen eyes and expertise to help please
xxxxxxxxxxxxxxxxxxxxxxxxxxxxxxxxxxxxxxxxxxxxxxxxxxxxxxxxxxxxxxxxxxxxxxxxxxxxxx

user@ubuntuPC:~$ ssh -v root@x.x.x.x
OpenSSH_8.2p1 Ubuntu-4ubuntu0.4, OpenSSL 1.1.1f 31 Mar 2020
debug1: Reading configuration data /etc/ssh/ssh_config
debug1: /etc/ssh/ssh_config line 19: include /etc/ssh/ssh_config.d/.conf matched no files
debug1: /etc/ssh/ssh_config line 21: Applying options for *
debug1: Connecting to x.x.x.x [x.x.x.x] port 22.
debug1: Connection established.
debug1: identity file /home/user/.ssh/id_rsa type 0
debug1: identity file /home/user/.ssh/id_rsa-cert type -1
debug1: identity file /home/user/.ssh/id_dsa type -1
debug1: identity file /home/user/.ssh/id_dsa-cert type -1
debug1: identity file /home/user/.ssh/id_ecdsa type -1
debug1: identity file /home/user/.ssh/id_ecdsa-cert type -1
debug1: identity file /home/user/.ssh/id_ecdsa_sk type -1
debug1: identity file /home/user/.ssh/id_ecdsa_sk-cert type -1
debug1: identity file /home/user/.ssh/id_ed25519 type -1
debug1: identity file /home/user/.ssh/id_ed25519-cert type -1
debug1: identity file /home/user/.ssh/id_ed25519_sk type -1
debug1: identity file /home/user/.ssh/id_ed25519_sk-cert type -1
debug1: identity file /home/user/.ssh/id_xmss type -1
debug1: identity file /home/user/.ssh/id_xmss-cert type -1
debug1: Local version string SSH-2.0-OpenSSH_8.2p1 Ubuntu-4ubuntu0.4
debug1: Remote protocol version 2.0, remote software version OpenSSH_8.2p1 Ubuntu-4ubuntu0.3
debug1: match: OpenSSH_8.2p1 Ubuntu-4ubuntu0.3 pat OpenSSH
compat 0x04000000
debug1: Authenticating to x.x.x.x:22 as ‘root’
debug1: SSH2_MSG_KEXINIT sent
debug1: SSH2_MSG_KEXINIT received
debug1: kex: algorithm: curve25519-sha256
debug1: kex: host key algorithm: ecdsa-sha2-nistp256
debug1: kex: server->client cipher: chacha20-poly1305@openssh.com MAC: compression: none
debug1: kex: client->server cipher: chacha20-poly1305@openssh.com MAC: compression: none
debug1: expecting SSH2_MSG_KEX_ECDH_REPLY
debug1: Server host key: ecdsa-sha2-nistp256 SHA256:ABEW0XEmv9AIZ7kpbx1iN8W7jHZrCao8nqJzjzY1VHE
debug1: Host ‘x.x.x.x’ is known and matches the ECDSA host key.
debug1: Found key in /home/user/.ssh/known_hosts:1
debug1: rekey out after 134217728 blocks
debug1: SSH2_MSG_NEWKEYS sent
debug1: expecting SSH2_MSG_NEWKEYS
debug1: SSH2_MSG_NEWKEYS received
debug1: rekey in after 134217728 blocks
debug1: Will attempt key: /home/user/.ssh/id_rsa RSA SHA256:2dUGRDiEqYJfHqegNaahC2CUJkF2qK5XIxO7JZkBe3o agent
debug1: Will attempt key: user@ubuntuPC RSA SHA256:qz22rniYxFqj+NVAfpCm5sgt1/CouoUWJjJi178Lxq4 agent
debug1: Will attempt key: /home/user/.ssh/id_dsa
debug1: Will attempt key: /home/user/.ssh/id_ecdsa
debug1: Will attempt key: /home/user/.ssh/id_ecdsa_sk
debug1: Will attempt key: /home/user/.ssh/id_ed25519
debug1: Will attempt key: /home/user/.ssh/id_ed25519_sk
debug1: Will attempt key: /home/user/.ssh/id_xmss
debug1: SSH2_MSG_EXT_INFO received
debug1: kex_input_ext_info: server-sig-algs=<ssh-ed25519,sk-ssh-ed25519@openssh.com,ssh-rsa,rsa-sha2-256,rsa-sha2-512,ssh-dss,ecdsa-sha2-nistp256,ecdsa-sha2-nistp384,ecdsa-sha2-nistp521,sk-ecdsa-sha2-nistp256@openssh.com>
debug1: SSH2_MSG_SERVICE_ACCEPT received
debug1: Authentications that can continue: publickey
debug1: Next authentication method: publickey
debug1: Offering public key: /home/user/.ssh/id_rsa RSA SHA256:2dUGRDiEqYJfHqegNaahC2CUJkF2qK5XIxO7JZkBe3o agent
debug1: Authentications that can continue: publickey
debug1: Offering public key: user@ubuntuPC RSA SHA256:qz22rniYxFqj+NVAfpCm5sgt1/CouoUWJjJi178Lxq4 agent
debug1: Server accepts key: user@ubuntuPC RSA SHA256:qz22rniYxFqj+NVAfpCm5sgt1/CouoUWJjJi178Lxq4 agent
debug1: Authentications that can continue: publickey
debug1: Trying private key: /home/user/.ssh/id_dsa
debug1: Trying private key: /home/user/.ssh/id_ecdsa
debug1: Trying private key: /home/user/.ssh/id_ecdsa_sk
debug1: Trying private key: /home/user/.ssh/id_ed25519
debug1: Trying private key: /home/user/.ssh/id_ed25519_sk
debug1: Trying private key: /home/user/.ssh/id_xmss
debug1: No more authentication methods to try.
root@x.x.x.x: Permission denied (publickey).
user@ubuntuPC:~$ ssh-copy-id root@x.x.x.x
/usr/bin/ssh-copy-id: INFO: attempting to log in with the new key(s), to filter out any that are already installed
/usr/bin/ssh-copy-id: INFO: 2 key(s) remain to be installed – if you are prompted now it is to install the new keys
root@x.x.x.x: Permission denied (publickey).

Hey @LiwiLiwi!
From what I can see from your steps, I have the following thoughts:
Are you trying to log in to a VPS (Virtual Private Server)?

If yes -
Have you altered the SSH configuration to disallow Root Login?
In you have a second “yes” then you cannot copy your SSH ID to the VPS - as the copy requires the password login option to be active.

If no -
Know that all Ubuntu-based distributions have the root account disabled, therefore you cannot SSH to a system via a root account.

yes is the answer. I have re-imaged my local pc, and trying to re-establish ssh with VPS. Any ideas or i will need to reinstall VPS?

Hello Vasileios,
I too am having problems with logging into my VPS. I posted a couple days ago…

What do you mean by:

I’ve been logging into the VPS as root with a password. It is only when I try to use the SSH key I can’t do it. I haven’t disabled password login yet as I’ve already had to delete my first two VPS’s after I removed password login.

Hey @TNlass
By default, yes, Ubuntu keeps the root user as disabled. However, VPS providers manually activate it on their installation images. That’s how you are able to login.

Anyhow -
Since you cannot SSH to your VPS at all, it means one of the two:

  1. Your VPS provider has an external firewall where port 22 is blocked - or otherwise not open (it needs to be open to connect via SSH). In this case, I’d recommend checking your VPS provider’s panel to see if they have a firewall option that’s active.
  2. When you login to root via your VPS’ console, execute the following command to see if the actual internal firewall of Ubuntu is configured to block port 22:
ufw status numbered

Please let me know of the output of the above command. :slight_smile:

I get ‘status inactive’

I can get into the VPS because I haven’t yet disabled the password…I just can’t get the SSH to work…twice I edited the config file and that was when I couldn’t get in :smiley:

Once you disable Root login, you won’t be able to go via SSH either. You’ll need to create a new username and then copy the ID to your VPS prior to changing the SSH configuration. :slight_smile:
If you have an SSH key generated via the ssh-keygen command, then you will be good to go. However, first do the following on your VPS. Please note that when I write username, please change it to your desired user name; and when I write X.X.X.X, please change it to your VPS’ IP.

useradd username
usermod -aG sudo username
usermod --shell /bin/bash username
mkdir /home/username
chown username /home/username
passwd username

Once that is done, you can exit your VPS and return to your local system.
Then:

ssh-copy-id username@X.X.X.X

Once it is done, try:

ssh username@X.X.X.X

And please let me know if that works out for you.

I have always made a second user name so that is not the issue. But bash is showing up in some errors. I was following Will’s cheat sheet which didn’t have the bash command but I have a copy of yours too. I’ll use that this time.

I’ve been trying using the Ubuntu 20.04 distro on Linode but will try the Debian 10 distro on your sheet.

Ubuntu and Debian behave exactly the same on Linode. I’d recommend attention to the step sequence as that’s what can make or break the SSH.

Okay. I have gone through your sheet but stopped before messing with any config files. I have 110 lines of commands / messages I have saved. Want me to drop it in here?

Not much of significance other than I stopped getting the error I have always been getting…but it is still asking for my password so I don’t think it is working.

ssh-copy-id doesn’t seem to be working as intended but I think I worked around it.

e@e-Precision-3560:~$ ssh root@x.x.x.x
The authenticity of host ‘x.x.x.x (x.x.x.x)’ can’t be established.
ECDSA key fingerprint is SHA256:CC/72XMvpde3fbgEHT6lB+fR7+OI70FHr17QfN2eol4.
Are you sure you want to continue connecting (yes/no/[fingerprint])? yes
Warning: Permanently added ‘x.x.x.x’ (ECDSA) to the list of known hosts.
root@x.x.x.x’s password:

ADDUSER & CHANGE PERMISSIONS

root@localhost:~# adduser momgeek
Adding user momgeek' ... Adding new group momgeek’ (1000) …
Adding new user momgeek' (1000) with group momgeek’ …
Creating home directory /home/momgeek' ... Copying files from /etc/skel’ …
New password:
Retype new password:
passwd: password updated successfully

CHANGE PERMISSIONS

root@localhost:~# usermod -aG sudo momgeek
root@localhost:~# usermod --shell /bin/bash momgeek
usermod: no changes

ALREADY HAD PASSWORD BUT DID THIS ANYWAYS AND IT WORKED

root@localhost:~# passwd momgeek
New password:
Retype new password:
passwd: password updated successfully

MAKE DIRECTORY

root@localhost:~# mkdir /home/momgeek
mkdir: cannot create directory ‘/home/momgeek’: File exists
root@localhost:~# mkdir /home/momgeek/Downloads
root@localhost:~# chown -R momgeek /home/momgeek
root@localhost:~# exit
logout
Connection to x.x.x.x closed.

COPY KEY

e@e-Precision-3560:~$ ssh-copy-id momgeek@x.x.x.x
/usr/bin/ssh-copy-id: INFO: attempting to log in with the new key(s), to filter out any that are already installed
/usr/bin/ssh-copy-id: INFO: 1 key(s) remain to be installed – if you are prompted now it is to install the new keys
momgeek@x.x.x.x’s password:

Number of key(s) added: 1

Now try logging into the machine, with: “ssh ‘momgeek@x.x.x.x’”
and check to make sure that only the key(s) you wanted were added.

NOTE THE KEY IS STORED IN ‘authorized_keys’ BUT I COPIED IT INTO ‘id_rsa.pub’ AND THAT DIDN’T WORK EITHER (I’LL TRY REBOOTING)

THIS IS THE ERROR MESSAGE I HAVE BEEN GETTING CONSISTANTLY

e@e-Precision-3560:~$ ssh momgeek@x.x.x.x
sign_and_send_pubkey: signing failed for RSA “/home/e/.ssh/id_rsa” from agent: agent refused operation
momgeek@x.x.x.x’s password:

CHECKING FOR KEY IN DIRECTORY

momgeek@localhost:~/.ssh$ ls -la
total 16
drwx------ 2 momgeek momgeek 4096 Jan 21 01:16 .
drwxr-xr-x 4 momgeek momgeek 4096 Jan 21 01:04 …
-rw------- 1 momgeek momgeek 572 Jan 21 01:04 authorized_keys
-rw-r–r-- 1 root root 573 Jan 21 01:16 id_rsa.pub
momgeek@localhost:~/.ssh$ exit
logout
Connection to x.x.x.x closed.
e@e-Precision-3560:~$ ssh momgeek@x.x.x.x
sign_and_send_pubkey: signing failed for RSA “/home/e/.ssh/id_rsa” from agent: agent refused operation
momgeek@x.x.x.x’s password:

momgeek@localhost:~/.ssh$ cd
momgeek@localhost:~$ sudo cp -R /root/.ssh /home/momgeek
[sudo] password for momgeek:
momgeek@localhost:~$ sudo chown -R momgeek:momgeek /home/momgeek/.ssh
momgeek@localhost:~$ sudo chmod 0700 /home/momgeek/.ssh
momgeek@localhost:~$ sudo chmod 0600 /home/momgeek/.ssh/authorized_keys
momgeek@localhost:~$ exit
logout
Connection to x.x.x.x closed.

LOGGED IN AGAIN BUT IT DIDN’T TRY KEY??? WENT STRAIGHT TO PASSWORD

e@e-Precision-3560:~$ ssh momgeek@x.x.x.x
momgeek@x.x.x.x’s password:

REBOOT AND SAME THING

momgeek@localhost:~$ sudo reboot
[sudo] password for momgeek:
momgeek@localhost:~$ Connection to x.x.x.x closed by remote host.
Connection to x.x.x.x closed.
e@e-Precision-3560:~$ ssh momgeek@x.x.x.x
momgeek@x.x.x.x’s password:

CHANGED PERMISSIONS ON ‘authorized_keys’ BUT SSH STILL DIDN’T WORK.

NOTE THAT ‘authorized_keys’ IS NOW EMPTY AND IT WASN’T ME!?

momgeek@localhost:~/.ssh$ sudo chmod 0644 /home/momgeek/.ssh/authorized_keys
[sudo] password for momgeek:
momgeek@localhost:~/.ssh$ ls -la
total 12
drwx------ 2 momgeek momgeek 4096 Jan 21 01:16 .
drwxr-xr-x 4 momgeek momgeek 4096 Jan 21 01:17 …
-rw-r–r-- 1 momgeek momgeek 0 Jan 21 01:25 authorized_keys
-rw-r–r-- 1 momgeek momgeek 573 Jan 21 01:16 id_rsa.pub
momgeek@localhost:~/.ssh$ exit
logout
Connection to x.x.x.x closed.
e@e-Precision-3560:~$ ssh momgeek@x.x.x.x
momgeek@x.x.x.x’s password:

1 Like

[SOLVED]. In my case there was no way of access the VPS from my local terminal. I contacted my VPS host and it turns out there was a way of remoting into the VPS via VNC on my VPS management Panel. At the VNC terminal, I could use my last username and password (no ssh at the VNC terminal).

Once logged in, I re-enabled root password:
PermitRootLogin yes
PasswordAuthentication yes
UsePAM yes

then restarted the ssh:
systemctl restart sshd

exited and tried ssh from my PC and voila it worked.

Now you can copy and new ssh key to the server and harden your system afterwards…that is reverse the yes yes yes above

Thanks Vasileios
Rdgs Liwi

1 Like

Hey @TNlass!
You don’t need to go into this much detail to protect your keys. A simple chmod change, like the one we did in today’s Workshop will work.

The reason this happens is that your private key is missing from the default SSH folder. That is needed to be present in order for you to login. Thus, I’d recommend leaving it in the same directory where your id_rsa.pub is situated.

Okay. It was a simple problem. When I generated the ssh key (ssh-keygen command) it asked for a ‘passphrase’ which I put in. So I deleted all the ssh keys and generated a new one without the ‘passphrase’ and everything works like a charm!

Thanks for your help! :crazy_face:

1 Like

Awesome! Great work!
SSH keys can be troublesome if they’re not packed together (or redirected via the configuration file - if on different folder). Glad you got it working! :slight_smile:

I am having trouble with permissions (public key). This has been a problem since I installed openvpn on Linode vps per your pdf instructions for lesson 17. My vpn is successfully connected but I ssh into my usual root@ip address and i get permission denied (public key) I ssh into my new user@ip address and it logs me into
new user@localhost. There I’m fine until when i type in sudo apt install curl gnupg2 ca-certificates lsb-release ubuntu-keyring, it request a password of which I can’t recall jotting that password down and I can’t figure out how to find the password or reset it. I am a noobie and I am at a loss at the moment. I typed the later command in so as to begin process of installing nginx…I am guessing it should be installed on my server for my domain to be developed…???Help!!!Lol!

Hey @Gl
There’s a way to change the password of your normal user, provided you remember your root password (otherwise, you can change that on your Linode account. I’m attaching the screenshots below:

When you select your VPS, select the LISH Console to the top right of it.

Then, select the Glish, which will allow you to log in as root:

Once you login, execute the following command (remember to replace “username” with your actual username):

passwd username

Type in your new password twice. Once done, type:

exit

Now, when you SSH back in with your non-root username, you’ll be able to execute the sudo command normally.

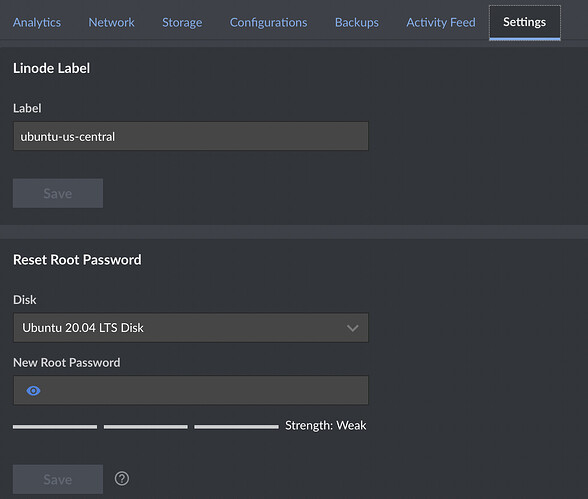
P.S. If you don’t remember your root password, select your VPS and go to Settings to change it, as shown below:

I hope this helps!

Bingo! It worked! Thank you abundantly!

1 Like

As always, it’s my pleasure @Gl! Enjoy! :smiley:

Here I am again. I have been locked out of both root and user. I create a Cpanel Linode and as I am not familiar with CentOS commands, I am guessing that I did not create folders for ssh key correctly. Also, maybe I should have somehow disabled GSS.
Permission denied (publickey,gssapi-keyex,gssapi-with-mic).